shipping container pool: 7 years out

July 25, 2015

IMG_20150720_113042

well, it has been many years since i’ve posted anything at all, and as is very obvious, keeping up this blog isn’t my day job. but… the shipping container pool is still alive and well, still a lovely blue, and keeping us cool all summer long.

we have treated it, as we posted previously, like an inside out ship: rust is part of our expectation and freaking out about a few spots is not our game. we have been using (periodically) a product called water weld made by jb weld to cover small rust spots, and it is a white two-part paste epoxy that cures in about 10 minutes, even immersed in water. and about every 2-3 years we have repainted the pool with olympic’s two-part pool epoxy called zeron. i built it originally with a 1 hp pump,  a zeobrite sand filter, and a natural gas heater.  hindsight being 20/20, we should have skipped the heater.  while the pool is mostly in-ground, it isn’t totally underground, and instead of a wonderfully insulative surrounding of earth and 18  inches of concrete, we have steel.  it’s like literally heating the outdoors… so we have never used the heater.

from a pool design nerd perspective, i have really wrestled with how to get the plumbing to better mimic a normal in-ground pool.  we started out with a few assumptions: a pool made of a container could move a little bit relative to the earth around it when it wasn’t filled with water, and the plumbing might move or might break.  so i decided to put no main drain in the bottom of the pool… it was a best guess that it might break off with shifting and leave us with a very hard to fix major leak.  that said, i needed a way to pull water back to the pump, and i was super afraid to cut too many holes in the container.  over the years, the ways i’ve learned to cover and manage rust have turned out to be simple, but they didn’t look simple before i knew them.   so… for a solution that worked for quite a while (5 years) i used a suction side skimmer that floated in the pool with a vacuum hose going out and down to the bottom of the pool.  it worked.  but since it was the only suction, if it was blocked, or knocked loose by a swimmer, i would have burned out the pump.  and then about year 5/6, it really seemed like there must be a better way to do it, and i started thinking about using an in wall skimmer like a normal concrete pool, and started studying every pool i was in, everywhere.  then, i was visiting friends in denver and they took me to visit this:

http://www.denverpost.com/ci_21123240/waters-cool-pool-at-denver-modern-site-gets

which i knew existed but hadn’t seen, and it was like my pool had a twin!  (it’s now the same color blue as mine.)  and they had done the plumbing the way i had been pondering.  so…. i did this:

IMG_20150720_113108;

it took buying an above ground pool skimmer (i buy everything online at doheny’s – free shipping!), hiring a welder to cut a hole in the side of the pool and fabricate a frame, then coating and painting all the raw metal (and doing a quick recoat of the bottom of the pool since it was drained anyhow) with sani tred’s multi-step no rust paint system and then olympic’s zeron.  then, with the deck in the picture above all out of the way, the skimmer was bolted onto the side of the pool and secured to the 2×6’s that form the deck frame.  the suction line from this skimmer is a 2″ line, which increased our flow to the pump many times over… the hole from the old suction line is still at the other end of the pool and we’re now using it to vacuum the bottom.   the whole system now runs more efficiently, and in all my reading, i realized that i had been wearing the pump by having too small of an inlet line in all these years.  it made the decision making for this little improvement worth it in multiple ways.  now the pool is a no-brainer, since the filtration system can do its job with no worry from me, and does it better than ever.  the pool is now, finally, complete.

IMG_20150720_113024

more on shipping container pools

June 11, 2009

in response to quite a few questions, including clarifications requested by my 10 year old son, here is part 2 on ‘how to build your own shipping container pool.’

the total cost of the project was $22000, more or less, which is about half of the cost of the bids i received to build a concrete 6′ x 30′ lap pool 5′ deep.  great deal, and we recycled something.  also, the look of the pool, and the feel, is completely different.  corrugated smooth metal sides, perfect boxy symmetry jutting right up against our house (there is less than 1″ of clearance between pool and house in a few spots).

the painting/sandblasting process was, by far, the most difficult part of the project, for a number of reasons.  the metal is pretty thin to start out, so the blasters have to be careful not to blast holes right through it as they’re getting ready to paint.  also, after the primer is done, or even after the final coat is painted, i have done minute inspections of every wall and corner, to ensure that any paint divots that might have low coverage get filled with epoxy.  i’m the one who did the filling with epoxy.  when it needs to be painted (or repainted), it has to be completely drained, swept, cleaned, and kept free from debris.  lots of manual labor is involved in building a pool like this, in other words.  i guess on some level that’s the case with any pool, but corin (our son) thinks i didn’t quite communicate with true accuracy how stinking hard it is to try to forge a new path in pool construction.  there are no ‘one stop shops’ for any part of the process.  if you want the pool, you will have to do a lot of labor and find a lot of willing people, who, even though you are paying them, are going to need your encouragement that, indeed, you want to pay them by the hour to weld every curve along the top edge of the pool.

if the pool rusts (you will see this very clearly underwater, even, or outside the pool looking in), it isn’t over yet.  think about all the metal containers in the world, all holding water, and all in various states of maintenance.  you will have just one of these containers, and you happen to have pool equipment sitting next to it and ladders attached to it, and you happen to swim in it, but it is still just a metal water-holding container, so DON’T panic when rust happens.  use underwater epoxy, and every few years, drain it and get it repainted.  it isn’t rocket science, but for the hobbyist pool builder to see rust, it can look a lot like you’ve just invested multiple thousands of dollars in a failing enterprise.

you haven’t.

our experience with choice of waterproofing is the following:  we didn’t think coating the metal to make it like a traditional pool made sense, after seeing the water tanks all over texas (and the rest of the world) and thinking through the technology behind water treatment plant maintenance.  if they can do it, so can we, we thought.  so here in austin, we found the company that maintains and refurbishes metal water tanks (blasting, paint procurement, and painting itself) and we hired them.  they did it all, and when after a year we felt like there were too many spots of rust in different areas (edges, missed corners), we called them back, and (after many trials, travails, and months of waiting) they just repainted today.

it should be only every 5-10 years that we repaint.  and we’re confident to touch up ourselves now, which is a big deal.  the paint is a multipurpose epoxy, made by devoe and the color is light blue.  i’ll try to add a picture later today or tomorrow.  still wet out there.

the most unhindered reaction i will ever hear.

April 24, 2009

[ed. note:  i wrote this in the 5 minutes after the visit, so if you read the typo version, i blame my eagerness to capture and the limitations of my pink eeepc.  i could only see the first half of each line as i typed.]

if i could have taken a video of the last 45 minutes without it being completely ridiculous and insulting, i would have.  but that would have been impossible, since i had no warning my friend **** was gong to be stopping by.  i never do.  today i got her a cup of crushed ice, as usual, and then we started talking, and then she started crying, and we talked and talked and talked.  about her life, how she isn’t used up, too old to try again, worth loving and knowing, and definitely someone that deserves respect.  she is always tired, always sad, and always carrying too many bags.  well, today i realized that she had never been out of our first floor, since we were talking about a painting of my uncle angus’ that she liked, and i told her we had two more upstairs.  we begin walking….

she touched everything, peered in close in a particular *** style that i am used to, but the most mundane of our objects were treated with reverence:  ari’s globe, the stair rail, the lights were all turned on to examine the quality of the light they produced.  she managed to ask me the source of every item i had purchased at anthropologie and none from anywhere else. kinda skewed the view, but whatever.  she saw the boys’ shower and got in, then (i forgot to mention this earlier, but she had switched to an english accent at this point) and exclaimed with great gusto that if she had a shower like ours, she would never get out.  after standing on the front balcony (elaia’s room) and waving at a neighbor  i don’t really now (she told me ‘i don’t know him, but whatever’ in british english), we went back in for a little lego examining, and then she told corin if she had showers like that she wouldn’t ever get out.  corin very seriously told her that perhaps it was better she didn’t have showers like ours.  she doesn’t like the gray primed pool, where’s the blue,  she wonders why we have pulp fiction in our movie pile.  she came out on the roof patio and we looked at all the plants, and then  in the fourth bedroom and she [turned on the light and touched everything, telling me how much she liked it] and then pretended to sit down against the wall between the bed and window, pretended to read a book, then leaned over and waved out the window at imaginary people, saying something akin to  ‘oh, how hard it must be for you down there.  sorry, we’re up here…  we’ll be right down.  just up on the top floor…’

i was dying of laughter with her, and at the absurdity of having so much, and not being able to rewind her life to give her a bed in our family, and yet wanting her to believe that a clean, loving space with relationships that encourage and support can be hers.  and i can hardly express how guilty/grateful/clueless i feel at the beauty of our home, family, friends and how little we appreciate it.

we talked about being reconciled to god, being his friend instead of his enemy (‘you, his enemy, no!’  ah, appearances can be very deceiving) and i hope that she can see through all this stuff to the one thing i have to give that won’t get old or out of date.  what an unexpected gift of a visit.

the how-to of a shipping container pool

April 20, 2009

[in case you’re interested in the details]

this post is being written in response to requests for a detailed understanding of how to recycle a shipping container into an in-ground swimming pool

1.  [waterproofing part 1]  the container is welded watertight.  really.  this took a long time, and it required hours and hours of welding.  we did not coat the inside of the container with something that would hold water.  i think this should be qualified by all the options we considered in talking to engineers and chemists we know and are related to, plus a few people at pool stores…  concrete and metal have different expansion/contraction rates, and that wouldn’t work.  spraying it with the liner people use in truck beds seemed like an option, but those aren’t pools – we opted out on research down that line because we then began to see the container as having a lot in common with a water tank.  then we found a company here in town (austin tx) that resurfaces and maintains entire water treatment plants… aha!  drinkable water, metal container, chlorinated water, no liner.  watertight welds were the trick.  and good paint.

2.  [waterproofing part 2] because every container comes with a standard interior base of marine-grade plywood, it seemed easiest to lay metal over this flat and weld at the edges than to remove it.  solid wood floor overlaid with sheet metal (i’m sorry, i think i should know this, but i think it’s 12 gauge steel)… and the weld along the edge of this plate should be a straight line.  along the top edge, there will be the need to weld along each corrugation as it intersects the plate on top, but the bottom line is easy.  another note – steel in shipping containers is not thick, so where the other steel channel is welded onto the outside, there is a high likelihood that there will be pinholes in the metal that will be visible from the inside.  it is really easy to see these once it is painted.  i have gone through and put on a marine grade epoxy (from a marine store, or aqua mend epoxy in putty form) after priming but before the final coat.  some of these can be applied underwater as well, so if rust spots become visible when the pool is full, the patch can be done anyway.  my motto is to tackle rust as soon as i see it, but not freak out about it (this has been a learned skill).  hey, it’s a pool made of metal, right?  can’t freak out about a little rust; it’s just par for the pool.

3.  [sizing]  we cut down the container to the size we wanted for a pool, within reasonable limits (no shallow end).  the standard container sizes are 20′ and 40′.  i kept shopping on craigs list for an open container at first, having started out thinking that i would have an 8′ deep pool.  then i realized they are 1. expensive and 2. hard to acquire.  it ended up that the welder we started talking to told me we would just cut off the top and use part of it for a newly engineered end, so i could spec an interior height and he would slice the entire top off in one go, roof and all.  a standard 40′ container can be found for about $2500, plus delivery,  if i could go back, i would visually inspect a container i bought for rust along the bottom corrugated edges and try to pick the least rusty one, but hey, we patched.

4.  [structural engineering] the civil engineer who consulted on the house we were building (the one that now has the pool as its backyard) thought our pool idea sounded ‘interesting’ so he came out and very nicely walked around in the dirt and did lots of sketches for very little money.  his resulting recommendation was to ring our now 6 foot tall container with 3 rings of steel channel, at 1/3 and 2/3 of the way up the outside with 2″x6″ channel, and then with a  box around the outside of the top of 6″ square channel.  i then asked that we add a 6″ plate of steel on top of this to allow for a smooth curb/lip that would keep water in the pool or have it splash over the entire top.  i will attempt to draw this?!!?

poolwall

5.  [shallow end?]  i have already said this, but to say it again, pretty much every available container has a roof.  which means that the roof has to be cut off.  this was an epiphany for me, since i had been imagining trying to enjoy swimming in an 8 foot deep pool.  if you’re going to have to cut the roof of anyhow, you can cut it at any height.  so we had ours cut to make an exterior height of about 6 feet, giving us a swimming depth of 5.5 feet of water.  perfect for laps.  we didn’t delve into a shallow end.  it seemed like too much complication for a beta.  you could make an entirely shallow pool, i.e. a wading pool?

6. [plumbing]  we used entirely the same plumbing as we would have for an in-ground pool, but the edge fixtures (inlets and return to the pump) are using the thin, gasketed fixtures that would be used on an above ground pool.  the pump, filter, heater, one-way valves, etc. can all be easily laid out by a pool store for you for no charge (they want your business) and all you really need to know is what the water dimensions are on your finished container.  we went around and around on whether to plumb it on the outside, attempt to plumb it along the inside walls (we were really stuck on the idea that we needed a main drain in the middle of the bottom for months), or maybe whether the plumbing made it impossible.  the main drain is a bad idea.  a main drain in a concrete pool is embedded in over a foot of concrete and rebar, so in the horrible case that the pool moves a little, the drain is going to move with it.  a shipping container, on the other hand, is going to be lowered into a carefully excavated hole lined with sand by a crane or a very large forklift.  how does that happen with a pipe attached to the bottom?  one option, expensive, would be to weld a permanent drain of non-pitting stainless steel pipe to the bottom of the pool and then have it turn a corner and come up one side (the side where the rest of the equipment will be set) so that it is an integral part of the pool.  i presented this option to the manager of the pool store i frequent, who then said to me, ‘well, people normally turn off their main drain when they’re running a pool vaccuum.  why don’t you just leave your vaccuum on all the time and have that act as a moving main drain?’

brilliant.

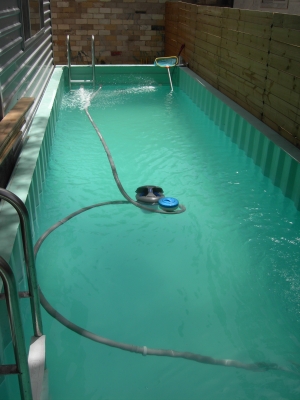
needless to say, that also solves the problem of the no shallow end/deep end:  the vaccuum is moving around.  we have a polaris atv.  if i could keep shopping i would, because our many pecan trees clog it up easily, but i think that’s also the lack of a cover.  also, we didn’t put skimmer baskets along the top edges (or edge, as this size pool could get away with having only one) because, again, in a beta it seemed like to many details to attempt to make it structurally sound and watertight at every seam and keep cutting holes in it.  we instead have a skimmer that floats on the water and has the vaccuum running out the other end of it, so that if the vaccuum gets blocked, there is still a place for suction to pull in water, and then our pump won’t burn out.  to say it another way, water gets pulled in from the bottom of the pool through the vaccuum, whose hose then runs up to the surface into the side of a floating skimmer (ours is a polaris lcs – leaf catcher and skimmer – meant for above ground pools), and the skimmer has a 2 part basket, collecting leaves and debris both from the vaccuum and from the surface, and out of the other side a long hose is running to a hole in the side of the container, which runs through pipes back to the pump.  from the pump, the water goes through the filter, then through the heater (if the heater is off, it still runs through – super easy), and back into 4 outlets that enter the pool right at the same height as the suction hole (about 8″ below water level).  by the time we had worked all this out, we just decided it didn’t make any sense to pay someone to implement what we already knew how to do, so we paid the electricians and plumbers that built our house only once the equipment was set up to tie in the gas (for the heater) and electrical.  you may have to find an electrician to do this on the weekend – a residential electrical company is not going to want to take on the liability of giving power to a pool. (ours didn’t)

7.  [details]  we had the outside underground part of the pool painted with a 4-part coal tar epoxy normally used by the oil & gas industry.  the inside of the pool is blue.  there are 2 ladders, one at each end (one is kind of on the side toward the end).  don’t do one ladder – you need an emergency exit for kids.  the container sits 18″ above ground, so you can see its shipping container coolness.  it also means the plumbing gaskets/pipes all sit a few inches above grade, great for doing the plumbing after the pool is in the ground, and also great for leak checking.

there are things i have forgotten.  i will add answers to questions i receive at the end of the post, here: _____________

coming soon….

April 11, 2009

a how-to on building a shipping container pool of your very own.

your backyard only has to be 10 feet wide.  but you do need access…

hi. hai. high?

April 3, 2009

so, we were walking home from karate yesterday at the pan am cultural center near our house (i was riding my bike alongside corin in his white karate uniform)… and a guy walking the other way makes his hands into a triangle as he passes and says ‘hai!’. corin looks down at his shoes sheepishly and says, ‘hi.’ quietly. to the ground.
i start laughing out loud and the guy is laughing behind us… i tell corin, ‘hey, you know he was making a karate joke… hai?!?!?’ and corin looks up at me, a little consternation etched into his face, and says, ‘oh, i thought he was high.’

wow.

on another note, we were riding our bikes home from the library today along 2nd street, and ari swerved and ran into the back of a parked subaru. he hit the back windshield with his forehead and the entire thing shattered (amen to tempered glass). we spent the rest of the day in the e.r.

aricrash

keeping it real [or going]

February 25, 2009

wagen

i continue, in the non-blogging life that i now lead, to do things that i think make sense in relation to building, conservation, and quality.  which means… i just bought old filing cabinets to use as planters on the roof patio, once i spray paint them cool colors (the orange of the counters and bright white) and waterproof them a little.  i am cooking from scratch again, with creativity and very little fanfare.  everyone is just happy to eat scones multiple days a week again.  we are eating lettuce out of the front planters, and mint is featuring mojitos and tea.  looking forward to pomegranates, meyer lemons, keffir lime leaves for curry, and thyme in our potatoes in the coming growing season.

i am also looking forward to filling the other bedroom on the second floor with a new child, our daughter-to-be from ethiopia, who will surely shake things up.

life on the east side is so many things, and so hard to capture in a way that isn’t trite or overly summarial.  we have dear friends now who are neighbors.  there are women i have cried with, who are happy to have a friend to listen and care, and  i am only too aware of how little pain & sorrow i have known.  it seems somehow wrong that i should be the one to hear, and yet i am here.  people come by now and ask about our house, and they have no idea… the history, the pain, the problems, the drugs, all gone now.

we take frances on walks, wave at our neighbors, play tennis on all the eastside courts (feeling very conspicuous), chat with the librarians, and visit our friends.  we have really moved, in so many ways.  and still our need, my need, for all the ties i had before, to people who cared about me and understood me, are even greater now.  the last nine months has shown me that i am not alone, and i can’t be alone.  i am who i am in relation to my family, and this building, and this life move, weren’t about the house (i knew that) but about people.  i am so glad to finally have time to do nothing, because having nothing to DO means i can call my friends for coffee and play cards with corin & ari.

or read out loud.  i’m getting a lot of practice.

wedding_small

all things are not tending to disorder hereabouts…

July 30, 2008

working to make the second law of thermodynamics untrue.  at least while i have breath.

i just went swimming. in a shipping container.

July 28, 2008

i finished a bible study with some friends on the roof and realized that i could just get on a suit and go downstairs.  this has only been 15 months in the making…

so the pool is blue.  really really really blue.  the water looks beautiful, and there are all sorts of interesting plays on space, verticality, and private/public space when you’re in the pool.  there are 10 feet from the back wall of our house to the fence, and all 10 feet are pool, which means that if you are standing in it, water just up to your chin (wow, perfect, eh?), and you look up, you see an alley to the sky with galvalum on one side and fence on the other, then pecan, then stars.

i find perspective hard to capture with a digital camera (or any camera, for that matter), so what follows are my attempts to show the final result.  there is a list a foot long of things visible in these pictures that is still undone (decks, planters, shed, plants, cleaning up), so just stick to the main event, eh?

also, those leaks turned out to be, like many other things in home building, worse in the first moment of discovery than in the problem solving.  we drained the pool below the level of the light, redid the light fixture (at midnight, and i wasn’t very nice to taylor), and then refilled to check again.  we decided marine epoxy was our second string, and i will now have to do a little epoxying underwater, as we have a drip.  but a drip isn’t bad, and definitely not disastrous.  we have had to tighten all our gaskets around the pool too (for inlets and outlets), but again, it goes with the territory.  in figuring our pool chemistry out, we have had an easier, less touch and go time, and have now added chlorine, shock (non-stabilized chlorine), muriatic acid (aka hydrochloric acid at 30%), 5# baking soda, more acid, 10# calcium, more acid, more acid, water to fill all !!! the way, and multi-daily doses of clarifier.  it is almost clear, and chemically stable and great.  like a real pool….

many views.  hope you don’t get vertigo.

on another note, we got the last electrical fixtures this week too, matthews fans, which taylor assembled, modded, and hung while we made hot wings and onion rings below in the ‘kitchen.’  here they are, along with a cool reflection on the roof.

i am grateful for the success.  it was, after all, a large metal experiment.

and, ohhh, no…

July 20, 2008

the housing for the light is leaking.  so we’re now siphoning the pool into the street… just enough to get in there with some great epoxy and make that baby watertight.  one freely spinning screw was enough, apparently, to undo us.

you can’t build yourself a pool without a year of weird problems…