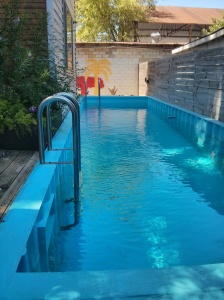
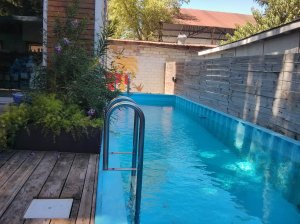
[in case you’re interested in the details]
this post is being written in response to requests for a detailed understanding of how to recycle a shipping container into an in-ground swimming pool
1. [waterproofing part 1] the container is welded watertight. really. this took a long time, and it required hours and hours of welding. we did not coat the inside of the container with something that would hold water. i think this should be qualified by all the options we considered in talking to engineers and chemists we know and are related to, plus a few people at pool stores… concrete and metal have different expansion/contraction rates, and that wouldn’t work. spraying it with the liner people use in truck beds seemed like an option, but those aren’t pools – we opted out on research down that line because we then began to see the container as having a lot in common with a water tank. then we found a company here in town (austin tx) that resurfaces and maintains entire water treatment plants… aha! drinkable water, metal container, chlorinated water, no liner. watertight welds were the trick. and good paint.
2. [waterproofing part 2] because every container comes with a standard interior base of marine-grade plywood, it seemed easiest to lay metal over this flat and weld at the edges than to remove it. solid wood floor overlaid with sheet metal (i’m sorry, i think i should know this, but i think it’s 12 gauge steel)… and the weld along the edge of this plate should be a straight line. along the top edge, there will be the need to weld along each corrugation as it intersects the plate on top, but the bottom line is easy. another note – steel in shipping containers is not thick, so where the other steel channel is welded onto the outside, there is a high likelihood that there will be pinholes in the metal that will be visible from the inside. it is really easy to see these once it is painted. i have gone through and put on a marine grade epoxy (from a marine store, or aqua mend epoxy in putty form) after priming but before the final coat. some of these can be applied underwater as well, so if rust spots become visible when the pool is full, the patch can be done anyway. my motto is to tackle rust as soon as i see it, but not freak out about it (this has been a learned skill). hey, it’s a pool made of metal, right? can’t freak out about a little rust; it’s just par for the pool.
3. [sizing] we cut down the container to the size we wanted for a pool, within reasonable limits (no shallow end). the standard container sizes are 20′ and 40′. i kept shopping on craigs list for an open container at first, having started out thinking that i would have an 8′ deep pool. then i realized they are 1. expensive and 2. hard to acquire. it ended up that the welder we started talking to told me we would just cut off the top and use part of it for a newly engineered end, so i could spec an interior height and he would slice the entire top off in one go, roof and all. a standard 40′ container can be found for about $2500, plus delivery, if i could go back, i would visually inspect a container i bought for rust along the bottom corrugated edges and try to pick the least rusty one, but hey, we patched.
4. [structural engineering] the civil engineer who consulted on the house we were building (the one that now has the pool as its backyard) thought our pool idea sounded ‘interesting’ so he came out and very nicely walked around in the dirt and did lots of sketches for very little money. his resulting recommendation was to ring our now 6 foot tall container with 3 rings of steel channel, at 1/3 and 2/3 of the way up the outside with 2″x6″ channel, and then with a box around the outside of the top of 6″ square channel. i then asked that we add a 6″ plate of steel on top of this to allow for a smooth curb/lip that would keep water in the pool or have it splash over the entire top. i will attempt to draw this?!!?

5. [shallow end?] i have already said this, but to say it again, pretty much every available container has a roof. which means that the roof has to be cut off. this was an epiphany for me, since i had been imagining trying to enjoy swimming in an 8 foot deep pool. if you’re going to have to cut the roof of anyhow, you can cut it at any height. so we had ours cut to make an exterior height of about 6 feet, giving us a swimming depth of 5.5 feet of water. perfect for laps. we didn’t delve into a shallow end. it seemed like too much complication for a beta. you could make an entirely shallow pool, i.e. a wading pool?
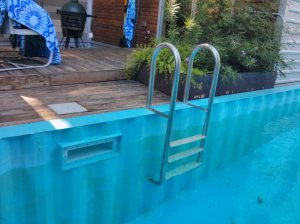
6. [plumbing] we used entirely the same plumbing as we would have for an in-ground pool, but the edge fixtures (inlets and return to the pump) are using the thin, gasketed fixtures that would be used on an above ground pool. the pump, filter, heater, one-way valves, etc. can all be easily laid out by a pool store for you for no charge (they want your business) and all you really need to know is what the water dimensions are on your finished container. we went around and around on whether to plumb it on the outside, attempt to plumb it along the inside walls (we were really stuck on the idea that we needed a main drain in the middle of the bottom for months), or maybe whether the plumbing made it impossible. the main drain is a bad idea. a main drain in a concrete pool is embedded in over a foot of concrete and rebar, so in the horrible case that the pool moves a little, the drain is going to move with it. a shipping container, on the other hand, is going to be lowered into a carefully excavated hole lined with sand by a crane or a very large forklift. how does that happen with a pipe attached to the bottom? one option, expensive, would be to weld a permanent drain of non-pitting stainless steel pipe to the bottom of the pool and then have it turn a corner and come up one side (the side where the rest of the equipment will be set) so that it is an integral part of the pool. i presented this option to the manager of the pool store i frequent, who then said to me, ‘well, people normally turn off their main drain when they’re running a pool vaccuum. why don’t you just leave your vaccuum on all the time and have that act as a moving main drain?’
brilliant.
needless to say, that also solves the problem of the no shallow end/deep end: the vaccuum is moving around. we have a polaris atv. if i could keep shopping i would, because our many pecan trees clog it up easily, but i think that’s also the lack of a cover. also, we didn’t put skimmer baskets along the top edges (or edge, as this size pool could get away with having only one) because, again, in a beta it seemed like to many details to attempt to make it structurally sound and watertight at every seam and keep cutting holes in it. we instead have a skimmer that floats on the water and has the vaccuum running out the other end of it, so that if the vaccuum gets blocked, there is still a place for suction to pull in water, and then our pump won’t burn out. to say it another way, water gets pulled in from the bottom of the pool through the vaccuum, whose hose then runs up to the surface into the side of a floating skimmer (ours is a polaris lcs – leaf catcher and skimmer – meant for above ground pools), and the skimmer has a 2 part basket, collecting leaves and debris both from the vaccuum and from the surface, and out of the other side a long hose is running to a hole in the side of the container, which runs through pipes back to the pump. from the pump, the water goes through the filter, then through the heater (if the heater is off, it still runs through – super easy), and back into 4 outlets that enter the pool right at the same height as the suction hole (about 8″ below water level). by the time we had worked all this out, we just decided it didn’t make any sense to pay someone to implement what we already knew how to do, so we paid the electricians and plumbers that built our house only once the equipment was set up to tie in the gas (for the heater) and electrical. you may have to find an electrician to do this on the weekend – a residential electrical company is not going to want to take on the liability of giving power to a pool. (ours didn’t)
7. [details] we had the outside underground part of the pool painted with a 4-part coal tar epoxy normally used by the oil & gas industry. the inside of the pool is blue. there are 2 ladders, one at each end (one is kind of on the side toward the end). don’t do one ladder – you need an emergency exit for kids. the container sits 18″ above ground, so you can see its shipping container coolness. it also means the plumbing gaskets/pipes all sit a few inches above grade, great for doing the plumbing after the pool is in the ground, and also great for leak checking.
there are things i have forgotten. i will add answers to questions i receive at the end of the post, here: _____________


